
INDIGO DYEING : Questions & Answers
Some of the questions on this page are specific to indigo dyeing using our Indigo & Shibori Natural Dye Kit, but many are applicable to indigo dyeing more broadly!
Your dye kit comes complete with a load of supplies and materials that you can use to make designs on fabrics. Some parts of the process are complex and we may not have had room in the printed instructions included to go in depth.
If you have a question that has not yet been answered to your satisfaction, ask away!

USE KEYWORDS TO SEARCH FOR ANSWERS TO YOUR QUESTIONS
The following is an index list of each Question and Answer title, click on the title to read the corresponding Q&A, or simply use search terms in the search box above to see if your question has been answered!
-
DIP TECHNIQUE
- Jul 26, 2023 Avoiding Fading
- Jul 26, 2023 Dipping Resist Pieces
- Jul 26, 2023 Maintaining Your Whites While Rinsing
- Jul 25, 2023 Dyeing Over Multiple Days
- Jul 25, 2023 Avoiding Sediment
- Jul 25, 2023 How Sediment Affects Your Dyeing and the Importance of Proper Rinsing
- Jul 25, 2023 Tips for Using Rice Paste in a Ferrous Vat
- Jul 25, 2023 Tips for Getting the Darkest Blues
- Jul 25, 2023 Suggestions for Uneven Coloration
- Jul 25, 2023 Rinsing Stencil Print Between Dips
- Jul 25, 2023 Number of Dips for Different Shades of Indigo
- Jul 20, 2023 Avoiding Sediment in the Ferrous Indigo Vat
-
DYE GARDEN QUESTIONS
- Jul 26, 2023 Starting Indigo Seeds Indoors Versus Outdoors
- Jul 25, 2023 When to Plant Indigo Seeds
- Jul 25, 2023 Indigo Seed Propagation
-
GENERAL INDIGO DYEING QUESTIONS
- Jul 26, 2023 Calculating Amount of Indigo Needed
- Jul 25, 2023 Dyeing Protein Fibers in a Natural Indigo Vat
- Jul 25, 2023 Dyeing Stretch Fabric with Natural Indigo
- Jul 25, 2023 Ferrous Vat Longevity
- Jul 25, 2023 Shelf Life of Natural Indigo and “Pasting-Up” Your Powder
- Jul 25, 2023 Toxicity of Indigo and Indigo Dyeing
- Jul 25, 2023 Indigo and Splatter Dyeing
- Jul 25, 2023 Indigo and Cotton Velveteen
- Jul 25, 2023 Indigo and Polyester
- Jul 25, 2023 Over-dyeing with Indigo
- Jul 25, 2023 Is Indigo Dye Okay for Sensitive Skin, Is it Safe Enough to use on Baby Clothes?
- Jul 25, 2023 Light and Pale Shades of Indigo
- Jul 25, 2023 Fixing Indigo Onto Fabric
- Jul 25, 2023 Materials and Fabrics Suitable for Indigo Dyeing
- Jul 25, 2023 Disposing of a Ferrous Indigo Vat
- Jul 25, 2023 Large Container e.g. Trash Can Vat
- Jul 20, 2023 Dye Vat Capacity
-
INDIGO LEAF EXTRACTION
- Jul 25, 2023 Making a Ferrous Vat with Fresh Indigo Leaves
- Jul 25, 2023 Clarification on Indigo Extraction
-
INDIGO VAT TIPS & TROUBLESHOOTING
- Jul 26, 2023 Is the Fermentation Vat the Best Vat?
- Jul 26, 2023 Indigo Vat Troubleshooting: No Longer an Odor
- Jul 26, 2023 Indigo Vat Troubleshooting: Dark Blue Vat
- Jul 26, 2023 Indigo Vat Troubleshooting: Greenish Tint
- Jul 26, 2023 Avoiding Fading
- Jul 26, 2023 Waiting 24 Hours Between Mixing and Using Your Indigo Vat
- Jul 26, 2023 Quantity of Indigo Paste in a Vat
- Jul 26, 2023 Making a Long Term Vat
- Jul 25, 2023 Indigo Flower Comes and Goes
- Jul 25, 2023 Using Pencil to Make Marks on Fabric - Does Graphite Affect the Vat?
- Jul 25, 2023 Under-Reduced Fructose Vat
- Jul 25, 2023 Troubleshooting a Different Vat Recipe
- Jul 25, 2023 Avoiding Sediment
- Jul 25, 2023 Indigo Vat Troubleshooting: Recipe Quantities for a Large Vat
- Jul 25, 2023 Sharpening Your Vat
- Jul 25, 2023 Stirring Your Vat
- Jul 25, 2023 Adding More Pigment to a Fresh Leaf Extraction Vat
- Jul 25, 2023 Making a Vat for Pale Dyeing
- Jul 25, 2023 Sizing Up Your Vat
- Jul 25, 2023 Indigo Vat Troubleshooting: Lye and Hydrosulfite
- Jul 25, 2023 Recipe for Pickling Lime and Fructose Vat
- Jul 25, 2023 Thoughts on Using Soda Ash and Spectralite Instead of Iron and Lime in Making a Dye Vat
- Jul 25, 2023 Giving Your Vat Enough Time to Set Up
- Jul 25, 2023 Switching Reducing Agent and pH Combo When Sharpening Your Vat
- Jul 25, 2023 Vat Temperature
- Jul 25, 2023 Precision of pH for Ferrous and Fructose Vats and Indicators of Under or Over Reduction
- Jul 25, 2023 Forms of Indigo that Work in a Ferrous Vat Recipe
- Jul 25, 2023 Indigo Vat Troubleshooting: Sludge and Sediment
- Jul 25, 2023 Indigo Vat Diagnosis: Vat Color, Flower, and pH
- Jul 25, 2023 Iron Vat Temperature
- Jul 25, 2023 Dissolving Lime in an Indigo Vat
- Jul 25, 2023 Reviving a spoiled or 'oxidized' indigo dye vat
- Jul 25, 2023 Mixing and Combining New Vat Ingredients with Old or Spent Vats
- Jul 25, 2023 Indigo Vat Mixing Temperature
- Jul 25, 2023 Weak Vat, Old Vat and Vat Health Restoration
-
PRE AND POST-DYE TREATMENTS & TIPS
- Jul 26, 2023 Preventing Crocking and Dyeing Large Fabrics Like Bedding
- Jul 26, 2023 Avoiding Fading
- Jul 26, 2023 Rinsing in Still Versus Running Water
- Jul 25, 2023 How Sediment Affects Your Dyeing and the Importance of Proper Rinsing
- Jul 25, 2023 Troubleshooting Strange Fading Patterns and Discoloration
- Jul 25, 2023 Suggestions for Uneven Coloration
- Jul 25, 2023 Fabric Drying Stiff and Crispy Post-Dyeing
- Jul 25, 2023 Indigo Post-Dye Rinse: Purposes and Options
- Jul 25, 2023 Protecting Your Indigo-Dyed Pieces From Fading: Proper Scouring and Soy Milk Treatment
- Jul 25, 2023 Sun Fading of Indigo
- Jul 20, 2023 Best Way to Dry Indigo Dye
-
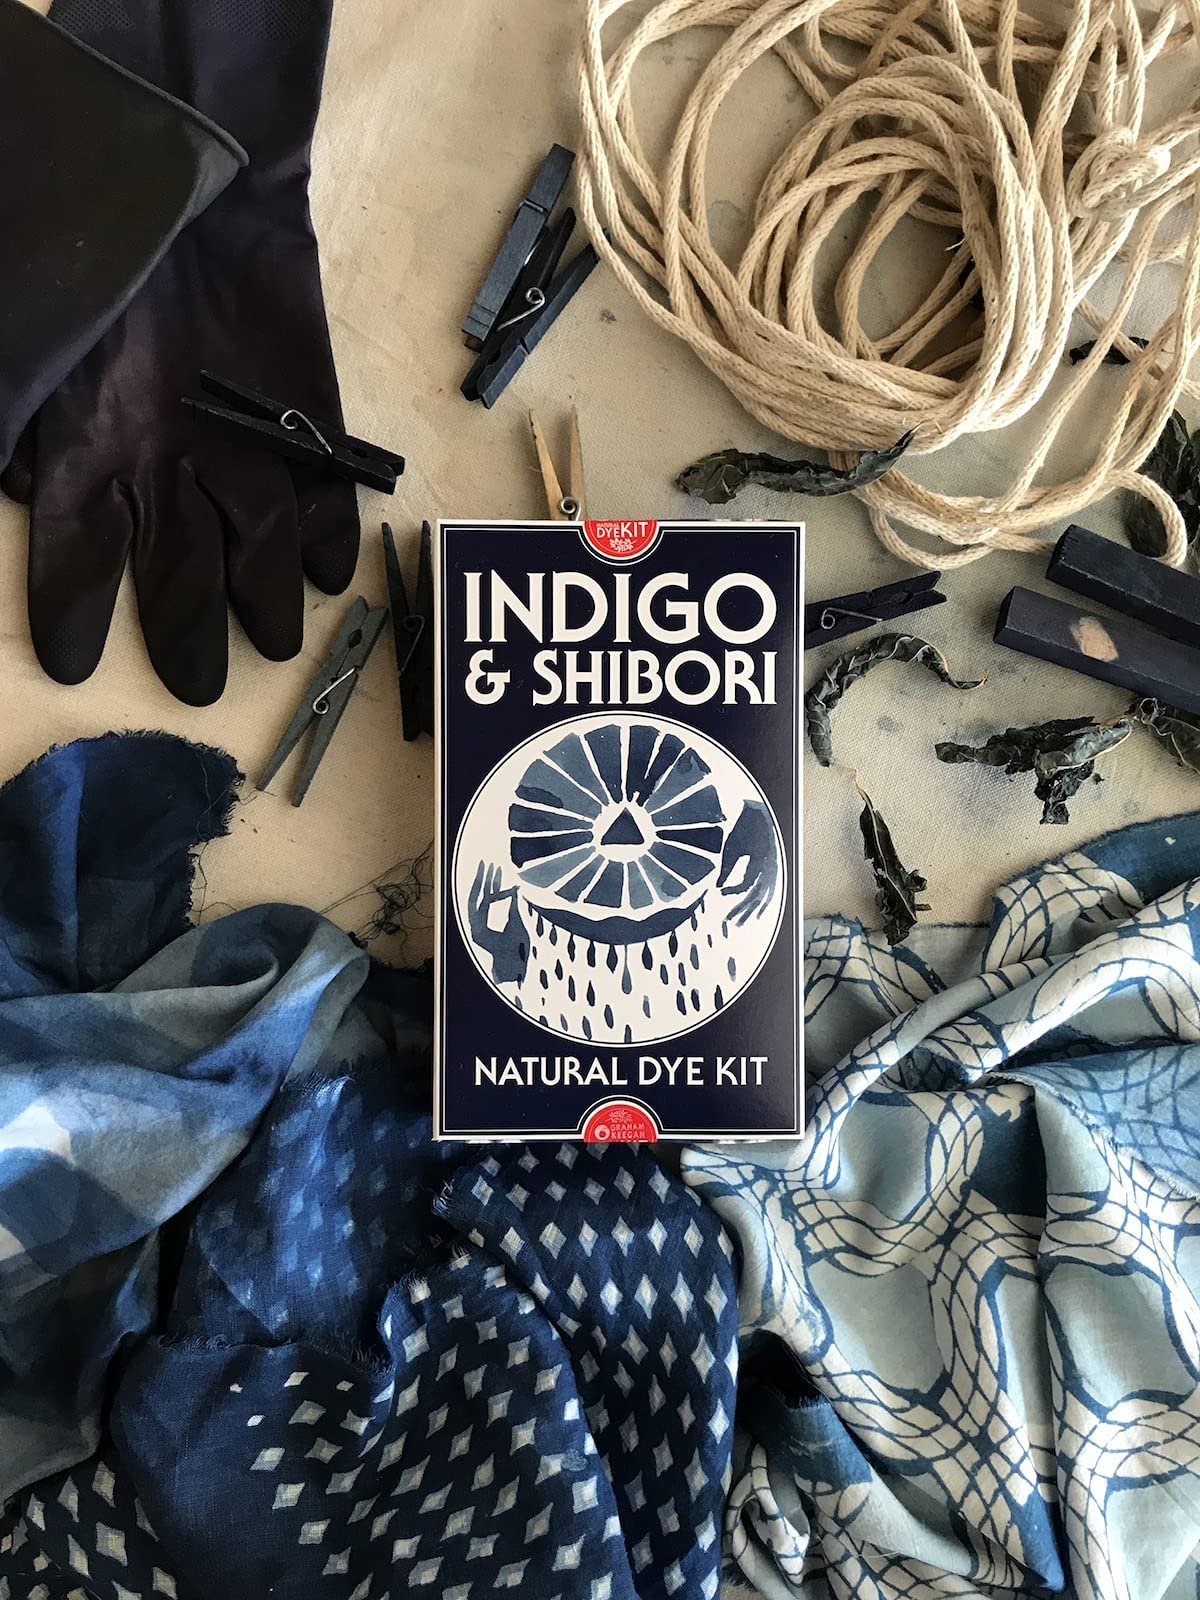
QUESTIONS ABOUT OUR INDIGO & SHIBORI DYE KIT
- Jul 26, 2023 Waiting 24 Hours Between Mixing and Using Your Indigo Vat
- Jul 25, 2023 Scaling Down Vat Size
- Jul 25, 2023 How Much Fabric Will the Natural Indigo & Shibori Dye Kit Dye?
- Jul 25, 2023 Ferrous Vat Longevity
- Jul 25, 2023 Components in the Natural Indigo & Shibori Dye Kit
- Jul 25, 2023 Indigo Form in the Natural Dye Kit
- Jul 25, 2023 Indigo Kit and Dyeing Large Items
- Jul 25, 2023 Light and Pale Shades of Indigo
- Jul 25, 2023 Scent of Natural Indigo
- Jul 20, 2023 Dye Vat Capacity
-
RICE PASTE
- Jul 26, 2023 Dipping Resist Pieces
- Jul 26, 2023 Pastry Cones for Applying Rice Paste Resist
- Jul 26, 2023 Indigo Resist Screen Printing
- Jul 26, 2023 Rice Paste Resist Longevity
- Jul 26, 2023 Destabilized AKA De-Fatted Bran in Rice Paste Resist
- Jul 25, 2023 Tips for Using Rice Paste in a Ferrous Vat
- Jul 25, 2023 Rinsing Stencil Print Between Dips
-
TIPS FOR VARIOUS DYE PROJECTS
- Jul 26, 2023 Preventing Crocking and Dyeing Large Fabrics Like Bedding
- Jul 26, 2023 Using Fresh Goldenrod Leaves to Make a Paintable Dye Pigment
- Jul 26, 2023 Type of Wood for Making Block Prints
- Jul 26, 2023 Mordant Recipe: Block vs Screen Printing
- Jul 26, 2023 Making a Stamp Pad
- Jul 26, 2023 Dyeing with Fresh Plants
- Jul 26, 2023 Indigo Resist Screen Printing
- Jul 26, 2023 Destabilized AKA De-Fatted Bran in Rice Paste Resist
- Jul 25, 2023 Dipping Metal in my Vat
- Jul 25, 2023 Using Natural Indigo Paste
- Jul 25, 2023 Dyeing Vegetable Tanned Leather
- Jul 25, 2023 Tips for Using Rice Paste in a Ferrous Vat
- Jul 25, 2023 Dyeing Paper
- Jul 25, 2023 Chalk and Cheesecloth Clarification in Mordant and Block Printing
-
USING MORDANTS
- Jul 26, 2023 Mixing Mordant
- Jul 26, 2023 Mordant Recipe: Block vs Screen Printing
- Jul 26, 2023 Diluting Mordant Paste
- Jul 25, 2023 Chalk and Cheesecloth Clarification in Mordant and Block Printing
Using Natural Indigo Paste
Q: Can I use your natural indigo paste for block printing on fabric or for use with stencils on fabric?
A: Natural indigo paste is a pigment but it needs a binder in order to adhere to fabric. If you were to apply it directly from the bottle to your fabric it would result in a temporary stain but then just wash right off. For the indigo to actually transfer and adhere to your fabric it must undergo a chemical transformation. Traditionally this is done by creating what is called a vat. You can find a wealth of information about creating a vat here: https://www.grahamkeegan.com/indigo-vat-basics.
Since natural indigo paste cannot be applied directly to fabric as a dye, pattern making is done by using resist on the fabric to keep the indigo from adhering to certain sections when you dip it into the dye vat. You can find some information about that specific process here: https://www.grahamkeegan.com/stencils-and-rice-paste.
Recipe for Pickling Lime and Fructose Vat
Q: I bought a bottle of your natural indigo paste and I would like to make a pickling lime and fructose vat. What amount of each do I need to use?
A: I've always used a recipe of 1 part indigo, 2 parts lime 3 parts fructose for this type of vat.
Dyeing Stretch Fabric with Natural Indigo
Q: Can I use a natural indigo dye vat to dye stretch fabric?
A: It really depends on what you mean by "stretch". The characteristic of the weave or knit is less important than the fiber content itself. You'll get better color uptake on materials that are higher percentage natural fibers, but I've used fabrics that are 50/50 cotton/poly and gotten decent results, about only 50% saturated compared to a full cotton. If you're using something that's like 92% cotton / 8% spandex you wouldn't really even be able to discern the difference in color uptake than with 100% cotton.
Thoughts on Using Soda Ash and Spectralite Instead of Iron and Lime in Making a Dye Vat
Q: I see that your Natural Indigo & Shibori Dye Kit uses, and most of your literature refers to using, Iron (Ferrous Sulfate) and Slaked Lime (Calcium Hydroxide) as the reducing agent and pH balancer to create a vat, do you have any thoughts on using Soda Ash and Spectralite instead? Is there a reason you prefer Iron and Lime?
A: Soda Ash and Spectralite have similar effects to the Iron and Lime I use but are not interchangeable for each other. The challenge that I've had with Spectralite is that it cannot maintain the health of a vat for any substantial amount of time and requires refreshing daily (or multiple times daily if dyeing lots of yardage). Also, the excess can build up in the vat and create challenges for you to achieve deep shades of indigo.
Scaling Down Vat Size
Q: I purchased your indigo kit and am wondering if there is a way to do a half batch or a third of a batch. I'm trying to dye very small quantities of fabric and don't want to waste any dye.
A: Sure, no problem. You can just scale all of the quantities of water, indigo, lime, and iron in the instructions by an equal amount to make a smaller vat. If you can, use a tall deep container for your partial vat. That will work better than a shallow broad container.
Making a Ferrous Vat with Fresh Indigo Leaves
Q: I grew some indigo plants and i’d like to make a ferrous vat so I can do some dyeing. Can you tell me how?
A: I have a resource page with lots of information on different ways to dye using indigo plants here: https://www.grahamkeegan.com/i-grew-some-indigo-now-what.
A quick sketch for making a ferrous vat with fresh indigo plants is as follows: soak your leaves in a 5 gallon bucket for a couple days until the leaves lose their color, then remove the old leaves and stems and keep the liquid. Add about a tablespoon of slaked lime to the liquid in the bucket, then aerate it until it turns dark blue. Once you've got the indigotin formed (dark blue liquid) then you can decant a gallon of the liquid, heat it to simmering, add 100g Ferrous Sulfate and 150g Slaked Lime, cover and let cool for a half hour before adding back into the larger bucket. Then let the bucket rest (though stirring intermittently) for an hour or so before trying to dye in it!
If you are unable to heat your liquid during this process, you can add the lime and reducing agents at room temperature, but without heat the chemical transformation can take as long as24 hours to complete whereas with heat it only takes an hour.
Keep a lid on the vat at all times and keep the water level up as high to the lid as you can. If you need to top it up, use boiling water.
How Sediment Affects Your Dyeing and the Importance of Proper Rinsing
Q: I am dyeing in a ferrous vat and got sediment from the bottom of the vat on my piece. Is that bad? What should I do?
A: A ferrous vat has an iron-rich sediment which collects at the bottom of the vat. If you’ve gotten any of this sediment on your piece make sure you rinse it thoroughly in fresh flowing water before it goes back into the vat for its next dip. If the sediment is resting on your piece when you dip into the vat the indigo pigment will adhere to the sediment and not the fabric. It functions like a resist on the fabric and when you finally wash the piece, you’ll rinse all of the indigo off back to the dip where the piece first hit the sediment. You can’t over-rinse between dips!
Contact with the sediment can also stain your pieces with a mottled brown/green. To remove the staining, wash the pieces with excess detergent in hot water (bar soap works great) until the water rinses clean.
The deeper your vat container is the easier it is to avoid the sediment. If you need to dye in a small vat but have pieces that are large in size you can try putting some sort of bag/basket/strainer in the vat secured to the top of the container so that your pieces literally cannot touch the sediment. Also, make sure to not stir the vat beforehand on the same day it is used to dye so that the sediment has time to settle.
Giving Your Vat Enough Time to Set Up
Q: I got your Natural Indigo & Shibori Dye Kit. I mixed up my vat and dyed a bandana in it. It came out green so I rinsed in water and parts turned blue but the majority is still green. I let it sit for a couple of hours and tried re-dying but it’s still green. Is there something I’m doing wrong? I’m thinking maybe I didn’t let the mixture rest long enough. Also, after I wait 24 hours if I re-dye it will it still be green or turn indigo?
A: Yes, this sounds like a normal occurrence if you haven't let the vat totally set up. You can get the color back to a true blue with a wash in hand soap, or a simmer in water with the citric acid (or both!). It will retain the green (which is actually a transparent yellow/orange from the ferrous sulfate which is used to activate the vat plus the blue of the indigo). After the setup time, pieces dipped in 'the clear' top part of the vat will dye blue, the sediment can still cause staining but much less than during the first window of setup time, so avoid it if you can.
Dyeing Vegetable Tanned Leather
Q: I heard it is hard to dye vegetable tanned leather with indigo. Is this true? I would like to try dyeing it with your kit but have no idea how it will turn out.
A: I actually have no experience with this, so have no comment except to say that one of the activating ingredients in my kit is ferrous sulfate, a water soluble form of iron. I’d expect that the tannins used to preserve the hide would react with the iron to form a grey black color if the hide comes in contact with the sediment in the vat.
Additionally, as a general matter, leather is a protein product and does not fare well at elevated pH (becoming brittle and cracking if left to dry in alkaline conditions). So, as a concept, I'd plan to rinse all leather pieces and re-establish a neutral or slightly acidic pH following each immersion into the dye bath so the leather does not dry out and crack from the alkalinity.
Switching Reducing Agent and pH Combo When Sharpening Your Vat
Q: I made an indigo vat using iron and lime. Now it is time to sharpen my vat. Do I have to use iron and lime again or can I switch to a different reducing agent/pH combo?
A: You can use any common reducing agent/pH combo! e.g. iron/lime, fructose/lime, thiox/soda ash etc. You don't have to stick with the one you started with.
Tips for Using Rice Paste in a Ferrous Vat
Q: I am interested in making an iron vat for the first time and would like to do some stencil dyeing with rice paste. I see that you suggest rinsing the fabric after each dip but I am concerned that the rinsing will cause my rice paste to come off. Do I need to rinse between every dip? What is the purpose of rinsing?
A: I rinse between dips for a couple reasons: first, it helps to oxidize the indigo more quickly and thoroughly, second, it rinses off any sludge, sediment or flower that may be trapped on the piece or in the crevices which would act as a resist for future dips.
But you have good instinct. When stencil dyeing with rice paste, to ensure the paste does not rinse off, I generally do not rinse between dips unless my piece makes contact with the sediment at the bottom of the vat. If your piece does hit the sediment you WILL need to rinse.
Make sure you don’t crinkle/crumple your pieces to get them in the vat. Rice pasted pieces do best when dipped cleanly into the vat. Because of this, be sure to dye in a very deep vat so your fabric can hang freely in the liquid and not touch the sediment.
For dark results where you need to dip many times, stick to 2-3 dips per day so the rice paste has a chance to dry out and stay firm. I have also found that if I stick to 2-3 dips per day (only dipping once is the safest bet) I can get away with rinsing gently between dips and then giving the piece 24 hours to totally dry out before doing further dips. Rice paste stays pretty resilient as long as it does not get too hydrated which is partly why I prefer using rice paste to clay or other resists which wash off very easily. I’ve found it to be the most tenacious non-wax resist.
I should also note that while dyeing in a heated vat has superior results to dyeing in a cold vat, when dyeing rice pasted pieces a cooler temperature works better because a warm/hot vat will disintegrate the paste after a dip or two.
How Much Fabric Will the Natural Indigo & Shibori Dye Kit Dye?
Q: Can you tell me approximately how much fabric one of your Natural Indigo & Shibori Dye Kits will dye?
A: A safe, loose estimate is 10-12 shirt sized garments to a dark shade of indigo. That said, the amount of fabric you can dye with this kit varies widely depending on how thick the fabric is, how dark you dye it, how much of the piece is blue vs white and how well you’re able to maintain the vat health!
Ferrous Vat Longevity
Q: I just purchased one of your Natural Indigo & Shibori Dye Kits. Once I create my indigo vat, do I have to use it right away or does it last for a while?
A: Your vat will last for weeks, once mixed up, if never used. The key to longevity of a ferrous vat is to minimize its contact with air. You should always keep it tightly lidded when it is not in use. And, when you're using the vat, make EVERY EFFORT to not slosh, splash, or drip back into the vat as that will oxidize your vat and leave the indigo pigment unable to bind to fabric. The kit is designed so that the pigment and the ingredients that activate it, should exhaust themselves at the same time.
Once you begin using your vat and it starts to lose potency, you can always rejuvenate it. I go in depth on the process of sharpening your vat on my page about indigo vat basics.
Shelf Life of Natural Indigo and “Pasting-Up” Your Powder
Q: I purchased some indigo dye several years ago and the label on the jar says it is 100% natural indigo and to use within 12 months. The contents are in large chunks. Must I throw it out or is it still useable?
A: Natural indigo is a stable pigment and has no set shelf life. As long as it is kept cool, dry, and out of light, I believe it can be used in perpetuity... I've used pigment that is many years old with no ill effects.
The chunks themselves will actually present you with a larger problem! Indigo needs to be "pasted-up" before use. Pasting up involves hydrating the indigo and getting it evenly dispersed in a pasty suspension. If you don't properly do this, you'll end up with chunks of pigment in your vat that will either be wasted or smear onto your fabric. A nice way to begin the “pasting up” when your indigo is in dried chunks like yours, is to run your chunks through a coffee grinder (though this creates a lot of dust). From there, I put the pigment into a plastic bottle with a bunch of pebbles and add just enough water to turn it into a thick/syrupy paste and SHAKE. I don't have a set amount of time to tell you here, but just know that you can't overdo it. This will make sure that the indigo is all broken up and available to be dissolved in your vat. Pour the resulting paste into the vat and rinse the bottle and pour the rinse in as well as many times as it takes until the stones and bottle rinse clear. From there you can use any vat recipe you prefer!
Components in the Natural Indigo & Shibori Dye Kit
Q: What is the component/powder used as a reducing agent in your Natural Indigo & Shibori Dye Kit? How is it different from base? What is the base that can be used?
A: The reducing agent for the vat in the kit is actually the combination of the Ferrous Sulfate and the Slaked Lime. Together they form a molecule which modifies the indigo molecule and causes it to become able to integrate and adhere to fabric. Both ingredients - plus the indigo - are necessary for the reaction to happen.
The base (or basic molecule) in the kit is the calcium hydroxide AKA Slaked Lime. In water, this molecule dissolves and separates into calcium and hydroxide ions, effectively raising the pH (alkalinity) of the liquid. Slaked lime is the appropriate base to pair with ferrous sulfate to create a vat. Do not replace with another base as the reaction will not produce the desired result of properly reducing the indigo molecule.
Vat Temperature
Q: I have a question about vat temperature. I would like to prepare a vat that I can keep for quite some time. While I understand that in initially preparing the vat, reduction is quicker with hot water - do I also have to raise the temperature of the vat every time I dye? Can I store my vat in a cool space? I would like to store it outside and the temperature can easily drop below 50 degrees.
A: Yes, this vat style (the ferrous vat) works well for a large range of temperatures. I've definitely used mine when it was in the 50s with good success but I am not sure that dyeing will go very well in a vat much colder than 50 degrees - although I’ve never tried!
Most traditional dyeing happens between 70-110 degrees. Almost all indigo dyes better when the temperature is raised (110 or so). So while you can dye in a colder vat, you may need to use longer dips at lower temperatures.
It is nice to be able to raise the temperature of your vat. When initially making your vat, it is ideal to begin with water that is near simmering. And, because you are wanting to prolong the life of your vat you will likely need to “sharpen” it over time and you will need to raise the temperature again during this process. You can find information about the sharpening process here: http://www.grahamkeegan.com/indigo-vat-basics/.
I recommend investing in an inexpensive 30-40 quart stainless steel pot which would give you the option of heating up your vat if need be. If you are going to be storing your vat in a steel pot, and not just using the steel pot for heating, it is good to find a pot with a tight fitting lid as this will also greatly prolong the life of your vat by minimizing its exposure to oxygen. If you already have a pot that does not have an ideal lid, you can always put a little bit of gasket material (like a door or window sealer strip) on the lid so when it sits there is a tighter seal.
Another option is to get some sort of heating element or bucket wrap like this to heat your vat right in the bucket: https://www.amazon.com/dp/B00OYEABGQ/ref=biss_dp_t_asn
It may seem "expensive" but it's amazing how much better a warm vat performs!
Toxicity of Indigo and Indigo Dyeing
Q: What is the toxicity of the indigo dye you sell? Would it be okay to use it to dye a cutting board made of wood?
A: The indigo I sell would be safe to use to dye a cutting board in terms of toxicity (although, important to note this is not true for all indigo dyes as many indigo dyes on the market - even those labeled “natural” - are produced using toxic chemicals).
So, while it would be safe to dye a wooden cutting board with the indigo I sell, I do want to caution that indigo is not a particularly "penetrating" dye. It will only dye the surface layer of the wood and if that is disturbed (cutting, sanding, chipping), the un-dyed areas below will be exposed.
Troubleshooting Strange Fading Patterns and Discoloration
Q: Some of my indigo-dyed pieces have developed yellowish haloes around what used to be light blue (dry already for weeks) and one developed a random yellowish streak where I would guess it had been exposed to direct sunlight? Any idea why this is happening or what I can do to get better results next time?
A: This type of fading/discoloring sounds to me like classic not-properly-scoured results. To properly scour your fabric prior to dyeing boil it in soda ash for at least 4 hours, then rinse thoroughly. Cotton (and other natural cellulose fibers) are often sheathed in waxes and pectins which are not ideal bonding sites for indigo because they can (and eventually will) separate from the cellulose fibers themselves, taking any indigo attached to them. Properly scoured fabric is free of these compounds and you’ll find that those fabrics dye more easily, evenly and the colors hold up best.
Also, did you properly wash and pH balance your pieces after removing them from the dye vat? If you leave them as is (without an acidic rinse) they have a tendency to fade as you’ve described when exposed to sun and humidity. If you are using my dye kit, be sure to use the provided Citric Acid as described in the instructions. If not, adding a half cup of vinegar to all the pieces in a load of laundry is strong enough to get them pH balanced.
Dyeing Paper
Q: Any tips for using your indigo kit to dye paper?
A: I have no experience dyeing paper, so I can’t speak to that, but I do have some general tips. Soak your material first (if possible, are you using cotton rag?) as this will allow the dye to penetrate the paper properly and not just sit on top where it can be scratched off easily.
Longer dips will give you a more lasting, penetrating dye transfer.
Tips for Getting the Darkest Blues
Q: Any tips for getting really dark blues with a natural indigo vat?
A: For a dark color, I dip my piece for at least 3 minutes per dip and THOROUGHLY rinse with cold water in between dips. You can re-dip as soon as you see no more green in the folds of the piece. There is no set time between dips, you actually just need to oxidize your indigo layers, which is indicated by the indigo turning completely blue.
Make sure to avoid hitting the sediment at the bottom of the vat. If you do, rinse and wash the material from your piece before attempting another dip, otherwise all subsequent dips in the vat will merely bond indigo to the sediment, which will eventually wash off, taking all that indigo with it.