
MORE THAN ALL YOU NEED TO KNOW TO MAKE YOUR OWN INDIGO DYE VAT
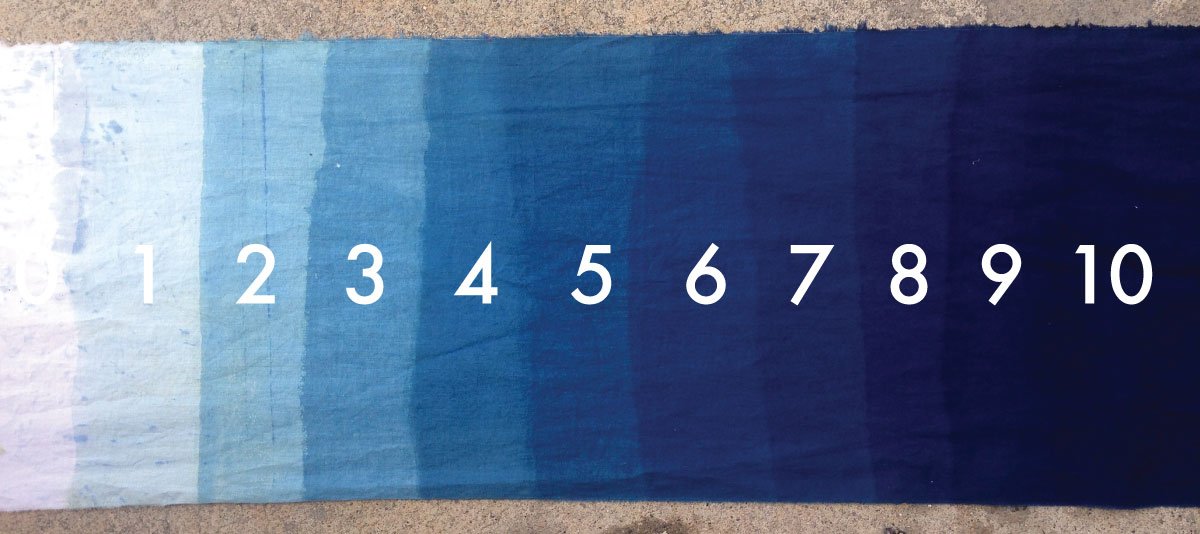
Each dip accumulates more pigment on the fabric. This stepped cloth shows the saturation from 0-10 dips in an Iron Vat.
A NOTE FOR BEGINNERS
If this is your first foray into the world of indigo dyeing, I recommend starting with a kit. Though the step by step, detailed instructions that follow can certainly be followed by beginners, for ease, convenience and potential for less frustration, an all-in-one kit can't be beat. I recommend my own natural indigo kit, but really, any (whether synthetic or natural) will help to familiarize you with the concepts and process of working with indigo. Thank you for humoring my plug, on to the info!

SKIP AHEAD FOR INSTRUCTIONS, MATERIALS AND NOTES ON BOTH
T.M.I to follow regarding Indigo's plant origins, the nature of the pigment and a bit of Vat chemistry.
INDIGO IS AN ORGANIC PIGMENT THAT CAN BE GROWN IN PLANTS
Indigo pigment is produced within the leaves of a broad range of plants across an array of genera. They have been historically grown on different parts of the earth that suit their particular needs (sun, moisture, soil, etc). Varieties range from Indigofera Suffruticosa in Central America, Persicaria Tinctoria in Asia, Isatis Tinctoria throughout Northern Europe and Indigofera Tinctoria primarily in South and Southeast Asia. I grow and have extra seed for each of these varieties, please get in touch if you are interested in growing any of them. You can certainly find a variety that you could grow in your local climate.
These plants each contain only a small percentage by weight of actual dyestuff in their leaves. It can take tons of plant material to make a few pounds of dyestuff. One way or another, the pigment is extracted from the leaves and can be purchased in a concentrated pasted, dried powder, ball or brick form. This indigo concentrate is often graded on its Indigotin content level, the percentage by weight of actual pigment. Indigotin levels of quality dye concentrate almost always range between 10% and 50%.
The indigo pigment molecule is non-reactive in water. It cannot be dissolved (like salt for example), but it can and must be put into liquid suspension as a first step to making an Indigo vat. The majority of indigo extract in the market is synthetically produced from fossil fuel extracts, it is generally cheaper, though functionally nearly identical to indigo derived directly from plants. The most common form of natural indigo in the marketplace is concentrated pigment in finely ground powder form from the plant Indigofera tinctoria or related species. All processes that I'm describing here presume that is the dye product you're working with. There are a wealth of other indigos out there, both natural and synthetic, most all of which you can treat similarly to this and get good results.
The indigo pigment molecule, as purchased, will not react with cloth or dye it. It can be rubbed in and will cause a temporary stain, but it is not dye. For the indigo to actually transfer and adhere with the cloth, we must create what is called a Vat. The Vat will be referred to with a capital V here, for at the scale of the individual dyer, the entity known as the Vat has an incredible amount of history and personage, requires pampering and sustenance, often warmth and food. The Vat serves to modify the Indigo molecule in such a way that it eschews inertness (as it tends to be when in blue-powder form) and chemically interacts with AKA dyes cloth (and other things, but for our purpose, cloth). The Vat must fulfill two conditions to properly modify the Indigo. The Vat must first have an elevated pH, a condition know as alkalinity in which the amount of OH− ions exceeds that of H+ ions in the solution. Second, the Vat must be a reduced solution, meaning (in this case specifically) that the solution is devoid of dissolved oxygen and there are an excess of electrons in solution which causes the oxygen atoms present on the indigo molecule to be reduced (essentially snatching up these electrons into their orbit) and changing the Indigo molecule into what is called Leuco-Indigo which becomes dissolved in the Vat solution. This change is easily visually confirmed! Leuco-Indigo will appear as a transparent yellow-green (not too dissimilar from a childhood favorite soda, Mountain Dew) as compared to the opaque dark blue of Indigotin in suspension.
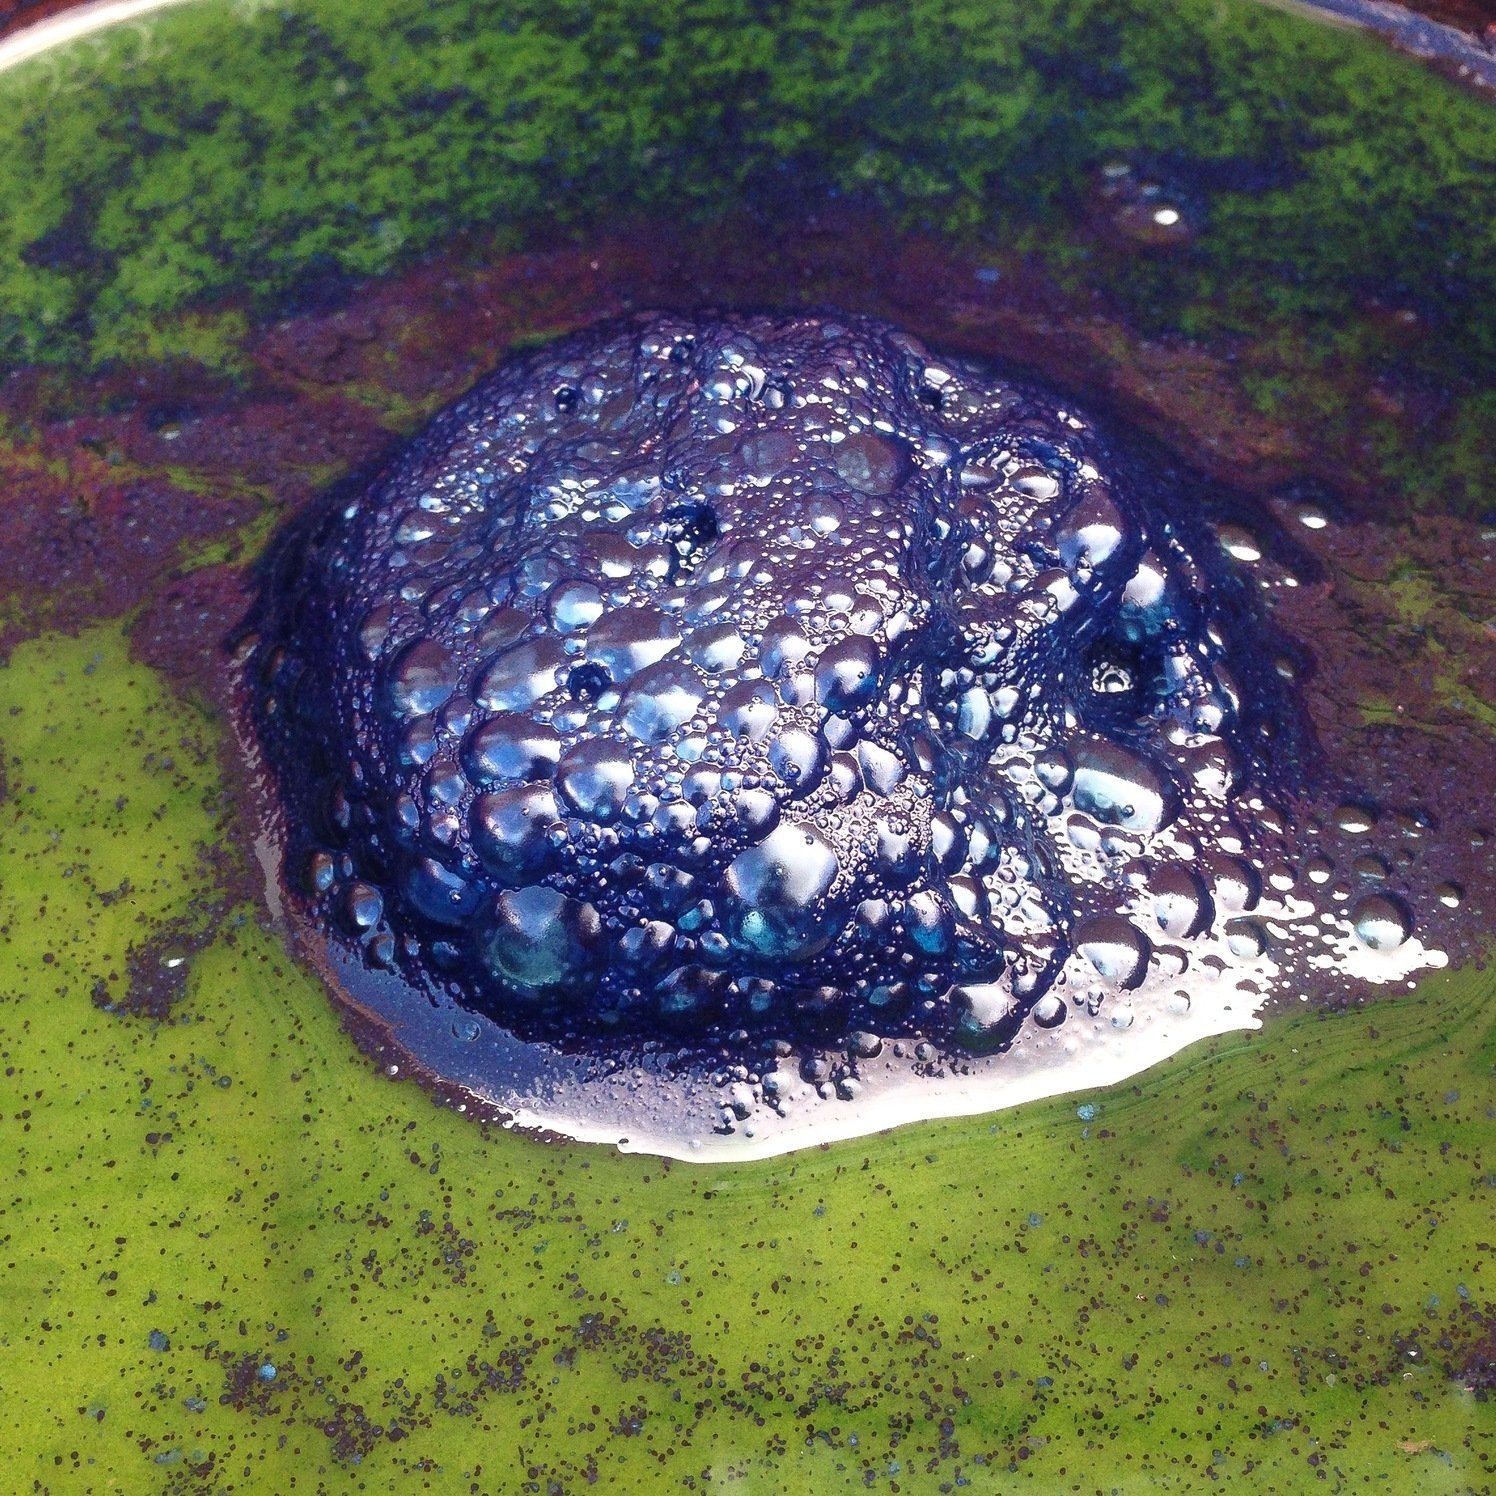
This photograph displays the indigo molecule in multiple forms. The dark, opaque blue ‘flower’ that sits atop an indigo vat is oxidized indigo - a molecule that will not dye fabric. The leuco-indigo dissolved in the Vat is visible as a yellow-green liquid - this molecule has the ability to chemically bond to (dye!) many different materials.
Once we have a properly reduced, leuco-indigo rich Vat, we can dip our cloth to dye with indigo. At the moment that the cloth emerges from the Vat it will be colored a tinge of green with the reduced leuco-indigo. As the piece comes into contact with the atmosphere, the pigment molecule, now adhered to the fabric, will lose its excess electrons and visibly transition back to blue.
There are many different ways of creating a Vat! There are many paths that will get you to the same finished product, a beautifully dyed blue piece! Each Vat style requires different ingredients and maintenance, and each has a set of positive and negative attributes.
The single best source for information about different styles of indigo and different ways of producing a vat is this book by John Marshall
The simple recipe that I advocate for the beginner is one that fits with our modern world. It is easy to make, requires no upkeep and (if properly sealed between uses) can be used on-demand for months at a time until it is exhausted of pigment. It is know as The Iron Vat. I've outlined the pros and cons for working with the Iron Vat below. If you have questions about this or any other kind of vat, feel free to get in touch.
IRON VAT PROS
• Simple Inexpensive Ingredients
• Can be saved and used over a period of months with essentially no maintenence
• Can easily yield a beautiful range of rich blues
• Is a cold (room temperature) vat. It does not require ongoing heating or re-heating in order to work properly. This is particularly crucial when dyeing with gluten resist, as a warmer vat will dissolve these materials
• Doesn't smell bad
• Great for cottons, rayons, hemps, ramie, linens, etc. Any cellulose fiber
• Perfect for shibori and stencil print dyeing
IRON VAT CONS
• Contains powders that can be inhalation irritants when dry and ingredients that are skin irritants in solution (though this is a fact of all indigo vats). Use of a respirator while working with dry ingredients and wearing gloves (not allowing skin contact with the Vat solution) mitigates these concerns.
• Not recommended for use by children. Contains soluble Iron.
• Not suitable for over-dyeing previously stained items, as the Iron can react with and may darken any impregnated tannins (coffee, tea, etc).
• Not suitable for protein fibers (wools and silks) as the excessive alkalinity can damage the fiber, making it brittle or scratchy feeling.
• Pieces MUST be rinsed between dips if any contact is made with sediment in order to avoid brown staining.
INSTRUCTIONS :
Indigo, Iron, Lime.
INGREDIENTS :
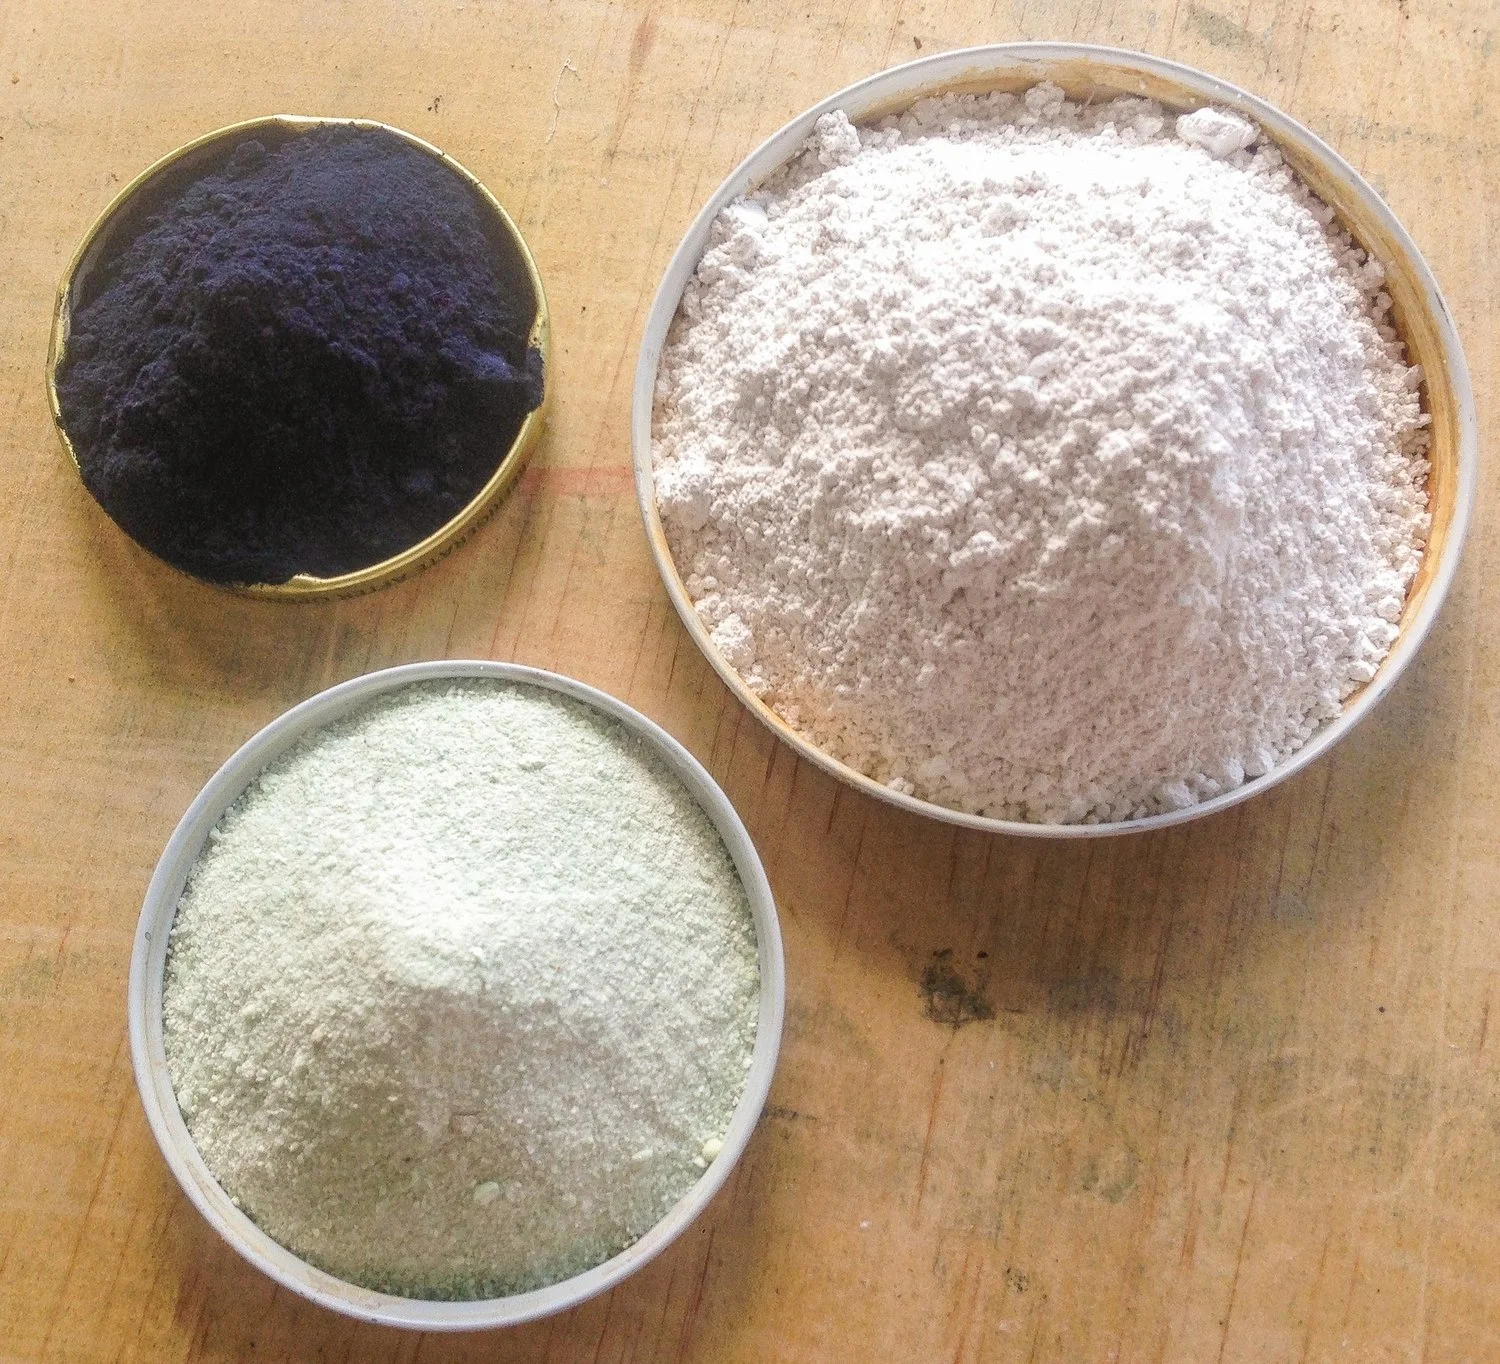
• 50g Plant Derived Indigo Dye Powder (dark chalky Blue/Black/Purple in color)
• 100g Ferrous (II) Sulfate Heptahydrate (granular, pale green particles the scale of beach sand)
• 150g Calcium Hydroxide AKA Slaked Lime or Hydrated Lime (fine white powder)
• Around 5 Gallons of water, the more pure the better
SUPPLIES, SEE NOTES BELOW :
• Accurate Kitchen Scale
• 5 Gallon Bucket with tight sealing lid, no holes or cracks in the bucket itself
• Empty plastic water bottle
• 20+ marbles, steel balls or pebbles that will fit into your bottle
• Stirring stick
• Respirator
• Protective gloves for your hands
• 50g Citric Acid or A gallon of vinegar is a nice thing to have as well. Either can be used (as a spoonful of citric acid, or a hearty splash of vinegar) in a gallon or so of water to create a weakly acidic rinse to pH neutralize your dyed fabric after it comes out of the vat.
DIRECTIONS :
• Measure out all ingredients and have them on hand, ready to mix
• Transfer the indigo powder into the bottle and add the marbles, balls or stones. Add just enough water to cover the indigo and shake for 2 minutes. We're talking vigorous cocktail shaking as opposed to a gently waking someone up shaking. This will hydrate the indigo making it more easily react in solution.
• Bring at least one gallon of water to a boil on the stove top in a stock pot. The volume is not particularly important as we are merely using it to make a condensed dye solution.
• Carefully pour the boiling water into the empty 5 gallon bucket (your Vat) and immediately add the Ferrous Sulfate, stirring until fully dissolved
• Add the Slaked Lime to the Vat and stir to mix until fully dissolved. The color should be a chalky green.
• Remove the top from your plastic bottle full of "pasted-up" indigo in suspension and gently pour it into the Vat, being careful not to pour out the marbles or stones. Add more fresh water back into the bottle and shake a bit more to rinse the contents and add that to the vat, repeat until the bottle rinses clear, use up every little bit of that indigo powder! The Vat should now appear chalky dark blue.
• Thoroughly blend in the indigo to the vat without splashing or agitating the liquid. I recommend just stirring around in one direction creating a vortex which will blend all the ingredients. Cover the vat when you're not actively stirring. Revisit your vat a few more times over the next hour and stir each time. You will notice a reaction beginning to occur! The iron and lime will fall out of suspension, settling to the bottom of the vat and the indigo will react with the dissolved ingredients and as it becomes reduced (undergoing the molecular change to leuco-indigo) the Vat will change color to a transparent yellow green color with a distinct coppery purple surface.
• Top up your Vat with hot water (splashing as little as possible) until it is a couple inches shy of full. This should leave you enough room to add items into the Vat and not displace so much liquid that the Vat spills out and over.
• Your vat is now ready to dye in! The indigo reduction reaction is ongoing and the vat will continue to strengthen for another day at least.
SHARPENING AKA REFRESHING AKA REJUVENATING AKA ADDING TO THE VAT:
In almost every circumstance, your indigo vat will become oxidized before it is exhausted. There is a difference, spend time to learn the signs and symptoms, it will help you control your vat conditions which will ease frustrations and empower your dyeing. Sometimes, both are true.
Whenever you place goods into the vat to be dyed, the conditions of the vat itself are changed in a couple ways.
First, EXHAUSTION : a bit of indigo pigment is transferred onto whatever is placed into the vat, there is only so much indigo in there, so eventually, there is no more to transfer onto anything that is dipped. When the vat is out of pigment, it is exhausted. A vat can appear perfectly well (properly reduced, great color, etc) but contain only an inconsequential amount of indigo pigment, so pieces you dip will not become darker.
Second, OXIDATION : each time anything is introduced to the vat, it brings oxygen and carbonic acid (natural molecules from our atomosphere) into the vat, these will eventually push the pH of the vat toward neutral (which makes the indigo fail to dissolve) and the excess oxygen will convert the leuco-indigo back into indigotin which is insoluble and non-reactive. An oxidized vat will appear dark blue/grey/brown. The contents of the vat may still be indigo rich (plenty of pigment), but that pigment is in no condition to transfer onto anything.
These are two separate problems that are solved differently.
Once you've identified your problem (hint: its probably oxidation), here's how you can solve it!
SOLVING EXHAUSTION : Simply, you need more indigo. If your vat is exhausted, this is a great time to totally start fresh on your vat. There may be bits of old resist, gunky sediment, etc that have settled to the bottom that can interfere with your dyeing. Whenever my vat is exhausted, I dispose of the whole contents and start fresh. The pigment itself is the most precious ingredient in the vat, so I prefer to work with fresh vats with fresh pigment instead of adding new pigment to an old tired vat.
SOLVING OXIDATION : Simply, you need to re-reduce your vat. Here's the recipe for working with the Iron Vat: Decant a gallon or so of your vat liquid and re-heat to simmering (180-190°F). Measure your reducing agent and pH adjusting ingredients. When sharpening a 5 gallon vat, I use 66g Iron and 100g Lime. Gently add those powders to the re-heated solution and mix them thoroughly. I use an immersion blender which removes any chunks from the lime and dissolves the iron almost immediately. Once fully dissolved, I'll gently pour this reduction stock back into the vat, stir gently but thoroughly and allow it to work and settle for at least an hour before dyeing.
SOLVING BOTH AT THE SAME TIME : Follow the directions for solving oxidation. Decant some old vat liquor, heat and add iron and lime, then just include an additional quantity of indigo. For a 5 gallon vat I tend to dose with 33g of indigo extract (pasted up, plus water, the whole deal as though you were creating a new vat), 66g Iron and 100g Lime. Reincorporate to the old vat liquid, allow an hour to rest, then dye again!
NOTES ON DYEING PRACTICES:
• WET BEFORE FIRST DIP. Never introduce an item into the vat dry! Always wet (and massage the wetness into the core of the piece if it is already bundled or clamped) and wring any piece before it is placed in the vat for the first time.
• DIP MANY TIMES FOR DARK COLORS. Indigo dyeing is a cumulative process! You cannot achieve a dark saturated blue with a single dip! You must dip multiple times to build up an accumulation of transparent blue layers that together add up to a dark blue! Your dips into the vat can be rather short : 30 seconds to a minute is often acceptable. However, longer dips will impart more pigment onto the piece and allow the pigment to flow into areas tucked away between folds. If practicing shibori, massage your pieces under the surface of the Vat, easing pigment into folded areas for saturated blues right up to your ropes or block resist.
• NO SPLASHING IN THE VAT. Maintain the optimum dyeing conditions as long as possible with your Vat by introducing as little air as possible to it each time you dip your piece. Air contains compounds that are detrimental to the indigo Vat: carbonic acid which will lower the pH of the vat and oxygen which will convert leuco-indigo back into its non-reactive form, indigotin. Place the lid over your vat at every moment that it is not in use to minimize the interaction between the Vat and the air.
• GENTLY DIP & UNDIP. Slowly lower your piece into the Vat, disturbing the surface as little as possible. When removing the piece from the Vat, do your best to wring out the piece while it is still beneath the surface of the Vat. Squeeze it tightly before raising it through the plane of the surface of the Vat, then gently release your grasp as you raise, so that when it is above the surface, it does not drip.
• AVOID THAT SEDIMENT. This indigo vat recipe calls for the use of iron which can actually stain and muddy your fabrics if too much of the sediment comes into contact with the fabric that you're dyeing. Most of this can be easily removed during a final citric acid rinse to pH balance the piece (citric acid is very effective at dissolving iron). Any remaining staining that appears as a result of the vat ingredients can be removed with a scrub with any bar soap. However, it is easier just to avoid the sediment altogether. When you're dyeing, I recommend placing a shallow mesh net or some sort of basket inside your vat (though secured to the top) that will allow you to immerse and move your work freely but wont allow the piece to touch the sediment at the bottom.
• RINSE THOROUGHLY AFTER YOU DIP. Vigorously, with lots of bubbles and splashing, rinse your piece in fresh water. Then wring out the excess water from your piece into the rinse bucket (not the Vat of course) until it is as dry as you can get it. This vat style has gunky sediment. This can get trapped in the folds of a piece and can cause staining and uneven coloration. Once the piece emerges from the vat, it can be rinsed in water immediately, this will not remove any dye from the piece. I usually have a rinse bucket set aside as well to be able to dunk, shake and agitate my pieces between dips. Get any and all sediment off the piece before allowing it to oxidize.
• FULLY OXIDIZE BETWEEN DIPS. There is no set amount of time to wait between dips into the indigo vat. The only factor that you need to be aware of is the oxidation state of the indigo molecule that is attached to your piece. This is easy to recognize visually (unless you are blue-green colorblind, in that case, ask a friend). A piece that is completely oxidized will appear fully indigo colored, showing no green. The last areas to oxidize between dips are always those the most tucked away in the folds and creases of the piece. Make sure to rinse these areas fully and allow them to oxidize. Before attempting another dip, peel and pry your pieces open to peek into the crevices and make sure your piece is fully oxidized (no green). If you still see green, vigorously rinse your piece in water again and wring it thoroughly. The more dry your piece, the more quickly it will oxidize.
• KEEP ON DIPPIN. A fully saturated Indigo blue will appear nearly purple-black when wet. If you are trying to achieve a dark color, keep dipping beyond what you think is necessary. When the piece dries and excess pigment is rinsed off, the color will lighten substantially.
• TOP UP THE VAT WITH BOILING WATER. When your vat liquid level starts to drop, top up your vat to full using boiling water. Boiling water contains essentially no dissolved gasses and is easier to reduce. Keeping your vat as full as possible helps to keep conditions properly reduced as the air pocket between the top surface of the liquid and the lid of the vat is smaller, allowing for less gas exchange.
• STIR VAT AFTER USE. When you're finished dyeing your pieces, gently stir your vat and circulate all the materials inside, still no splashing! Put the lid back on the vat and store it away until your next dye session.
• RINSE BEFORE OPENING. If you have the luxury, I recommend rinsing your piece under your coldest fresh flowing water AS you are opening it. This will help you keep your whites bright and from any stray dye from adhering to parts of your piece that are exposed at this time.
• BALANCE THE PH. When your piece is completely dyed, it will probably have been exposed to a Vat with pH 11 or greater! In the long run, this can be detrimental to the pigment and the fabric. Thoroughly rinse this piece in water, starting with cold, gently progressing to warm until no more pigment comes off the piece. Next, dissolve a small portion of citric acid (say, a tablespoon per gallon of water) and let your piece soak in that solution for 20 minutes. This will reduce the pH and also will help to brighten the blues of the piece if there is any excess iron that came into contact with the fiber. Rinse.
• FIRST WASH YOUR PIECES ALONE. After balancing the pH, wash your pieces with a neutral detergent on their own in a cold water wash. If mixed with other garments during this first wash, there is the possibility that they will crock off, transfer color through rubbing against other pieces (I've tinted many a white shirt blue this way. After a couple washes and some time in the sun, they go back to bright white though!).
DISPOSING OF THE VAT:
The rinse water which eventually will take on a blue tint is safe to dispose of in any drain. However, the vat itself should be thoroughly whisked when finished dyeing, then allowed to settle. The liquid on top can be disposed of down any municipal water system, though the sediment should be thrown in the trash. If you have a septic system, I recommend avoiding pouring any of the vat into it as it may have an effect on the active microbes within. When I'm dyeing in the country (on a septic system), I actually just dilute the vat in excess water and use it to water/fertilize the lawn. It contains only gypsum, chalk, iron oxides (which are often used as soil amendments themselves) and a little indigo pigment which will break down in the soil quite quickly.
NOTES ON INGREDIENTS & SUPPLIES:
INDIGO & SHAKER:
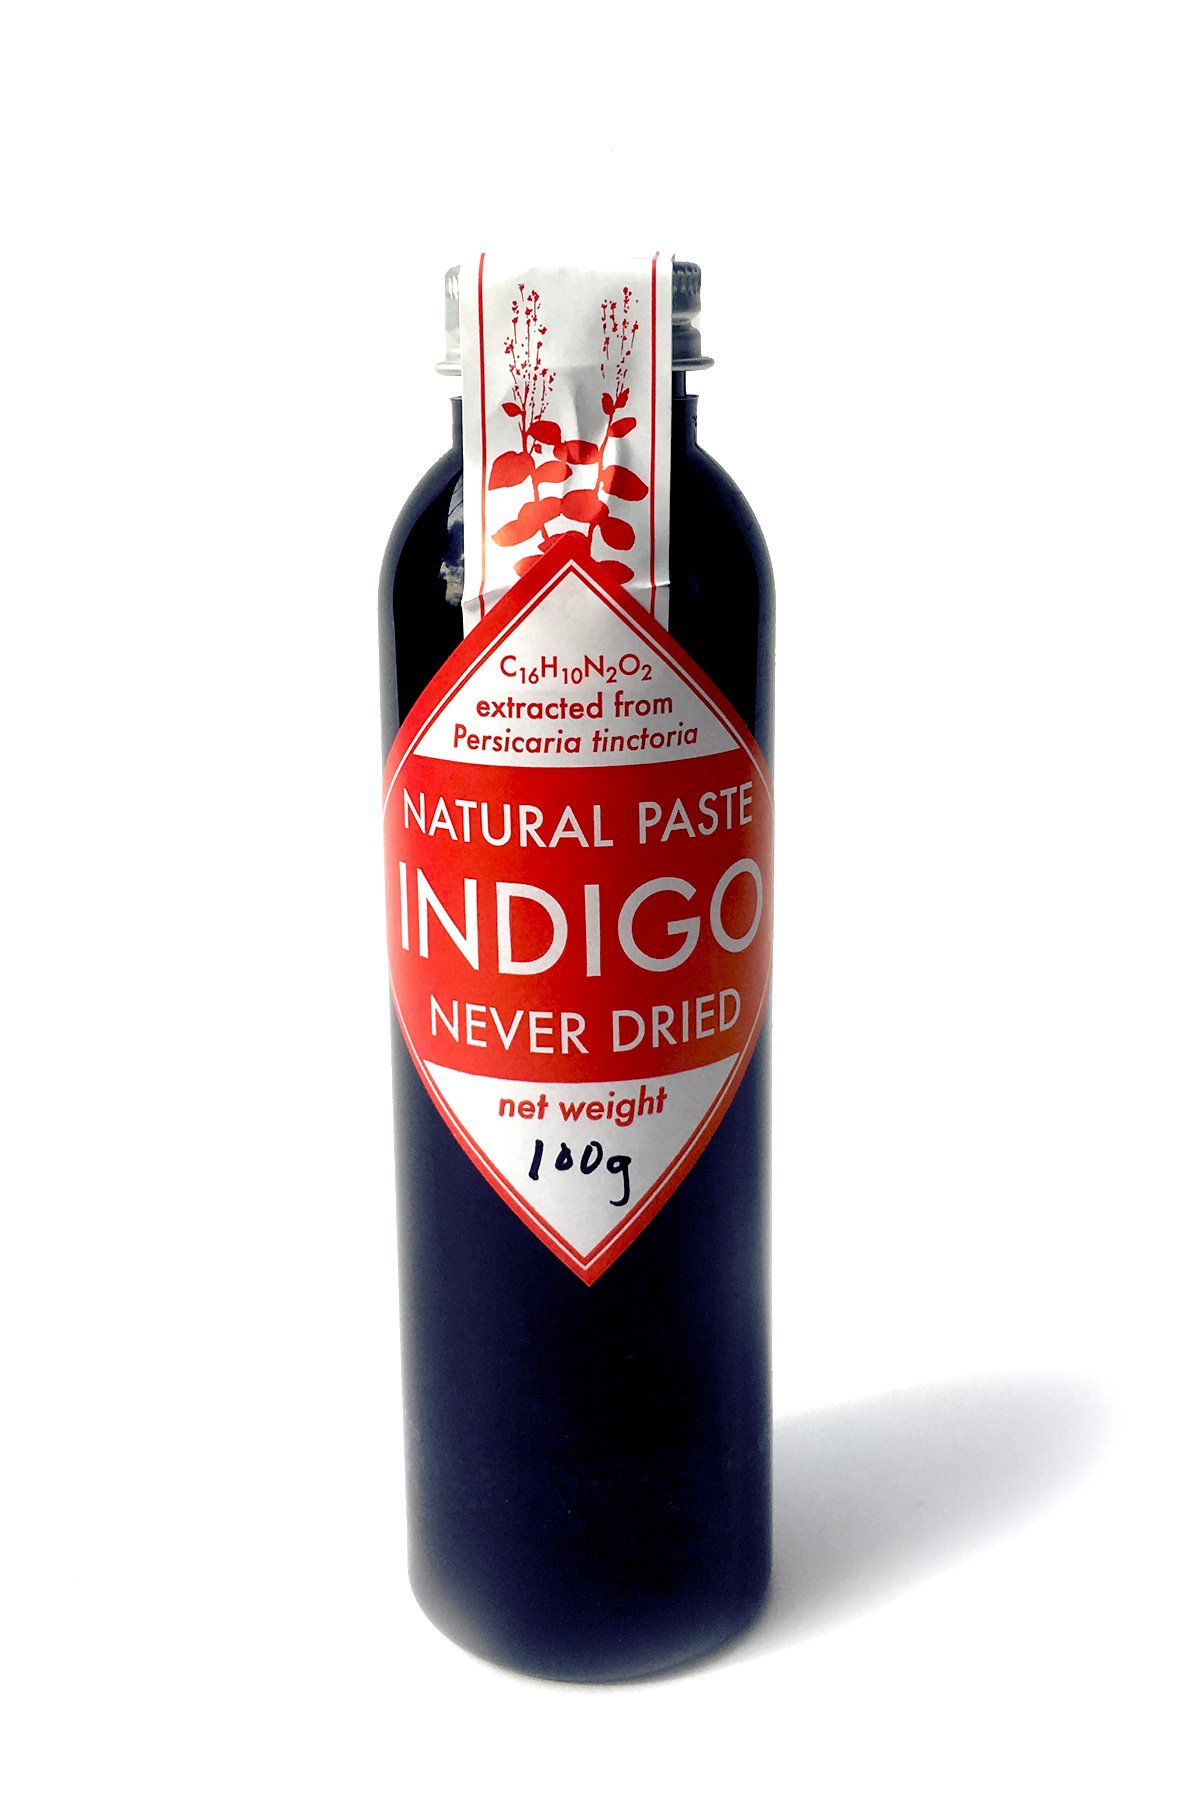
I can't speak highly enough about the quality of domestic indigo that I work with. This stuff is grown in Tennessee and extracted from Persicaria tinctoria and Indigofera suffruticosa and Indigofera tinctoria. I bottle it up for sale here in Los Angeles. To my knowledge, this is the only available indigo extract that is grown in the United States. If you are aware of others, please let me know! There is rampant fraud on the indigo market where synthetic indigo is being represented as natural indigo to garner a higher price. I'd be wary of any suppliers that you are using for the first time. Or, you can simply assume that your indigo is synthetic (which is also fine).
As a shaker bottle, I recommend just using an empty shampoo container. The disc cap is the best for getting the indigo suspension out of the bottle while keeping the marbles inside. I included a link below to show you exactly what I'm talking about. You really could get away with any plastic container that can be sealed and shaken. I've used glass marbles as agitators in the past but find that they can actually break when forced into contact with each other so much. No need to end up with little shards of glass at the bottom of your vat. In their stead, I recommend metal balls, which cannot break, but should be rinsed and dried after use. Also, pebbles work just fine. The real effect we need here is the smashing and agitation, and stones do a perfectly good job of that (and are generally readily available)
VAT INGREDIENTS & SAFETY GEAR :
You can often find both of these Vat modifiers locally at hardware stores or nurseries, though they may have additives and other chemicals mixed in. These blends are not suitable for Vat use. Below are pure, tested forms of the ingredients that work perfectly with this recipe. These are both powders that can cause irritation when inhaled. Always take care to protect yourself and your lungs when working with any dry powders. This is a good simple respirator and pair of gloves. Most any will be sufficient, but I've found that a tight fit on the respirator is important as is a long cuff on the glove.


SCALE :
All dye calculations are most accurately done by weight. I recommend picking up a little digital kitchen scale that is dedicated specifically to dye processes. I've tried many scales and this is by far my favorite. The price is just about as good as it gets for any kitchen scale and this one is 10 times more accurate that most comparably priced models. It is light, portable and takes 2 common AAA sized batteries.

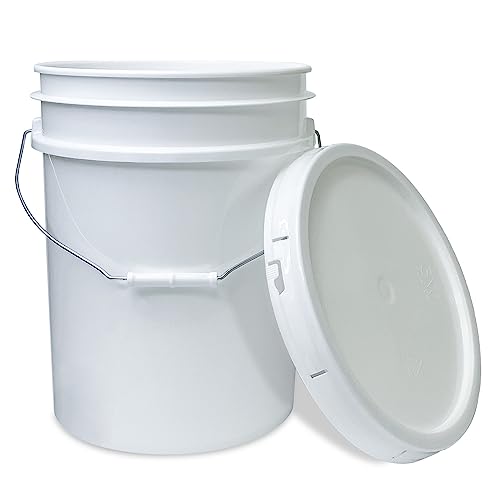
BUCKET :
This 5 gallon bucket is an ideal size for a starter Vat. Indigo vats like to be in deep containers with minimal surface area. This shape allows for minimal chemical interaction of the Vat with the atmosphere, prolonging the life of the ideal dye conditions. The dream shape is a tall column, the nightmare shape is a puddle. If you choose to use a recycled bucket, make sure that it is clean, has a tight fitting lid, no holes or cracks and a good handle to make moving it around as easy as possible.
GENERAL NOTES :
MAKE HEALTHY CHOICES - As with all dye processes, we're working with concentrated pigments, chemicals, hot liquids, heavy things. Each of these hazards can be dangerous to our bodies if we are careless with them. Make choices that protect your body for the long run : wear gloves when working with the Vat, wear a respirator when working with any powders, handle hot liquids carefully, be careful lifting that heavy thing, etc.
EXERCISE YOUR PATIENCE - Throughout this process there are so many appealing ways to cut corners and hurry toward results. Each one of them will compromise either yourself, your safety or the quality of the final product. Please do your best to avoid all shortcuts! You will certainly be more pleased with the final piece, which is what you'll have to hold after the process is through.
NO SUBSTITUTIONS - This is chemistry. Specific chemical reactions require specific ingredients to occur properly. Take time to prepare and acquire exactly what you need before beginning.