EVERYTHING YOU NEED TO MAKE STENCILS AND PRINT WITH RICE PASTE AT HOME
CUTTING STENCILS
I've found that these thin plastic cutting mats actually act as really great stencil material. They are a good thickness, allowing just the right amount of rice paste to be deposited onto the cloth. They can be washed and rinsed and hold up well. Be very careful to not mis-cut and sever a small connection on your stencil. This material is essentially impossible to repair (tape doesn't stick to them). You could hypothetically be able to stitch a repair together (though I've never tried this). If your stencil gets a little warped, I've found that you can briefly iron it on low heat between layers of fabric and then press it flat between a couple large books as it cools and it will return to flatness! I tend to burn through blades for the xacto, snapping tips when I try to corner the blade too quickly, so I like to have a back stock of fresh sharp blades. I typically just cut on old scraps of plywood so I don't ruin my tabletop, but if you don't have access to that, this little self-healing mat is nice. Scale up to a larger mat if you are cutting larger stencils as this one is only letter sheet sized.


MAKING THE PASTE RESIST
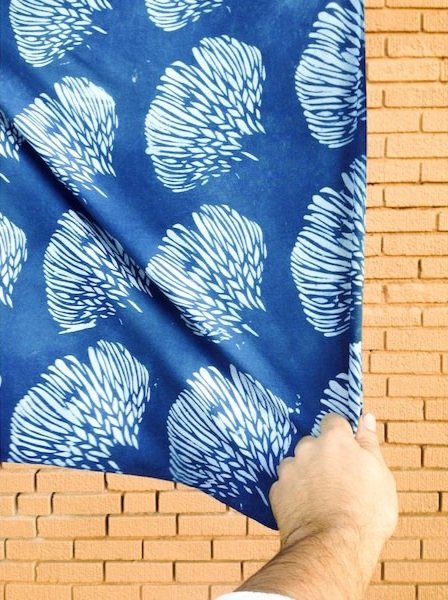
Here's the premise: Indigo pigment can't attach to what it can't get to! A layer of rice paste will act as a barrier between the indigo pigment molecule and your fabric. Sticky rice paste is VERY sticky. It will attach to your fabric and wont come off until it is soaked and scrubbed. You can apply this paste onto the fabric any number of ways (paint, stamping, stencils). But, I've found that the crispest images, strongest layers of resist are formed when passed through a thick paper or plastic sheet stencil. Once that paste has dried onto the fabric, the item is ready to be dipped (gently) into an indigo vat. Everywhere that you've printed will stay white and all other areas will be dyed.
INGREDIENTS:
These are also available in smaller quantities (at slightly lower prices), but I found that the volume discounts more than make up for the initial investment.
I've also listed my favorite (through trial and error) tools below with some reasons why they work well.


INSTRUCTIONS:
• Weigh out 1 part Mochiko (sweet rice flour) and 1 part Rice Bran (e.g. 6 oz. and 6 oz. for a good little batch). Make sure the bran is de-fatted, aka stabilized. Otherwise the oils in the bran quickly become rancid and compromise the paste.
• Mix together well. This mix can be set aside and stored in a sealed container for future use.
• Mix 2 Parts (by weight) dry mix to 1-1.2 parts (by weight) water (e.g. 12 oz. dry mix to 6-7 oz. water). Slowly add water to the dry mixture and blend together (by hand is best to be able to sense the consistency) until a dough forms that is similar in consistency to pie dough.
• Pack dough into little dumpling sized balls. This shape and size will allow the pieces to cook through evenly and allow steam to circulate around them through during the cooking process.
• Place a piece of damp cloth (not wax or parchment paper, which will dissolve and stick to the rice balls over the long steam time) into a steamer tray and set rice balls on top of it, gently wrapping them. Both the steamer tray in an electric rice cooker or a traditional bamboo steamer will work. I had never used a bamboo steamer and found this video helpful! Its so easy!
• Gently pour one cup boiling water over 2 tablespoons of hydrated lime. Wear a bandana or dust mask as the powder (before fully mixed) can be an inhalation irritant. The lime will settle out to the bottom while the rice balls cook. The remaining water will be very alkaline and used to thin the paste to working consistency
• Steam rice balls for a minimum of one hour (sometimes up to two hours) until they are cooked (sticky, soft, gooey, even consistency) all the way through. You can under-cook (centers are still dry and crumbly), but I've never over-cooked.
• Transfer the rice balls (now soft and very sticky) into a mixing cup (if you're using an immersion blender) or a suribachi if you're looking for a workout. (See comparison notes below)
• Immediately begin blending the rice into a paste and gently adding the settled lime water, add slowly and steadily as you blend until the consistency of the paste is reminiscent of hippie peanut butter, or very sticky brownie batter. You may notice that the paste takes on a yellowish cast as it reacts with the lime.
• Add a tablespoon of glycerine and a 1/4 teaspoon of salt for each 8 oz of dry mix. This helps keep the stencil hydrated (salt is hydrophilic) and flexible when it is dry and keeps it from cracking.
• Blend some more! You CAN NOT over-mix your paste. The smoother it is, the better it will grip your fabric and maintain its integrity in the vat. When you get to a zero-lump, even consistency, your paste is ready to use.
• If your paste is too thin, it can have the tendency to creep under the edges of the stencil, if it is too thick, it will be super sticky and difficult to spread. But there is quite a bit of wiggle room. I recommend just going for it and seeing what consistency you prefer.
• Print away!
NOTES ON TOOLS:
SCALE:
This little scale is pretty great, the price is just about as good as it gets for a kitchen scale and it is 10 times more accurate than most scales. For this particular project, that level of accuracy isn't necessary, but for other dye projects, the extra decimal place makes essential accurate measuring possible. Spend the extra $6 compared to the cheapest ones and have a high quality, accurate portable scale.

MIXING CUP:
This high cup is great for a number of reasons:
• high walls : When using the immersion blender, a vertical container is much better than a shallow one like a bowl or cup. The vertical column of material makes blending and mixing smooth and efficient. Blending in a bowl is difficult. Also, the height keeps splashing material from spraying around
• stainless steel : I drop things ALL THE TIME. These cups will not break from careless treatment of oopsies of any variety. Stainless steel is also non-reactive and will not compromise the ingredients placed within. It is easy to clean compared to other materials. It will not break during temperature fluctuations. I'm often pouring hot liquids into and out of vessels and I've broken too many glass containers to justify the attractiveness of transparent walls, I'm a slow learner.
• smooth walls : Many of the things that I mix are VERY sticky and/or goopy. If you use a container that has any sort of bottle neck (jars, e.g.) it can be challenging to get the material out of the container. Get a little soft spatula and it is a breeze to empty this thing.


RICE COOKER:
I've tried both the options below and am actually much more pleased with the traditional steamer. It requires more attention throughout the process, making sure there is plenty of water to properly steam, but it really does seem to cook faster and produce more steam, adequately hydrating the rice balls as they cook. The rice cooker is a nice machine to own (great for cooking rice in its down time), and is nice because you can set the time and walk away (though the time on this model does only go up to 30 minutes of continuous steam before needing to be reset). Both the products below are small. They will certainly cook enough rice for a hobbyist's needs. The bamboo steamer can actually hold about double what the electric cooker does because it has two steaming chambers.


BLENDING:
I'm usually a traditionalist, but in this case, I have to side with the immersion blender over the Suribachi (ye olde blender). I use mine many times a day for mixing everything. It really is incredible at doing it's job! I've had mine in daily, borderline abusive use for over a year and I have nothing but praise for it still. However if you want the feel and ethic of the traditional method, you can hand blend materials in this ridged, ceramic bowl. It really is good at blending up materials into smooth consistency. This suribachi posted is SMALL. If you're of greater means, and you would like to do this often, I'd recommend a larger bowl (10" minimum). I've hunted and hunted and cannot find one for what seems to me to be a reasonable price point, below $100. If you see one, let me know. I've also heard on good authority (thanks @garnerblue) that the paint-mixer-in-the-drill option works great to blend your paste up to the perfect consistency.