
NO BOIL BLACK
BY GRAHAM KEEGAN

This recipe is a riff on a portion of the 1734 French manuscript by M. de Beaulieu describing the process demonstrated to him by the Indian cotton painters of Pondicherry.
‘Black’ is a quick charicterization of the actual color this creates which is a standard iron-tannin charcoal. The original manuscript calls for a number of ingredients that are challenging or expensive to acquire in the United States in the year 2019, so I’ve done some experimentation and offered up replacements that have worked for me.
The source process document is available in full, translated into English, with photographs as Appendix ‘A’ in the book Origins of Chintz by John Irwin and Katharine B. Brett published by Her Magesty’s Stationery Office, 1970. If you’re a fan of Chintz, the OG hand produced kind, this book is an incredible catalog of work and process. The book lacks color plates EXCEPT for Appendix ‘A’, where the process is shown, step by step, in full color.
Thanks to Erika Molnar for your insights and suggestions on the process
Many thanks to the tradition and lineage of dyers which culminated in the incredible works produced in 17th and 18th century. Thank you for sharing!
INGREDIENTS YOU’LL NEED :
Natural fiber cloth (linen, rayon, hemp, cotton, silk, wool, etc)
Whole milk from cows (other milks would certainly work, this is just the most accessible to me)
Tannic Acid (powdered extract is easiest to use, though any tannin source can be used by the astute, intrepid dyer)
Ferrous Acetate
Vinegar
Guar Gum
Soda Ash
Water
TOOLS THAT WILL HELP:
Tall Cup or steep bowl
Large mixing bowl or stock pot
Immersion Blender (those who know me know I rave about the Cuisinart CSB-75. Cuisinart, if you’re out there, I’m accepting sponsorship) I’ve put mine through YEARS of abuse and it is still running great.

Newspaper or blotter paper
Brushes or blocks to put the mordant onto the fabric.
Washing Machine and Dryer (not strictly necessary)
INSTRUCTIONS:
• Scour fabric. As with all natural dye processes, properly scoured fabric will accept color more readily and evenly and the adhered pigment will be more resistant to sun fading, rub transfer and maintain good color through multiple washes. So, SCOUR!
For more in-depth scouring info, refer to my mordant printing page.
• Mix one teaspoon tannic acid per one cup of milk with an immersion blender in your tall cup or deep bowl then transfer to your larger stock pot. The mixture tends to froth up and smell like a sweet malt ice cream float. The totally volume needed varies depending on the amount of fabric you are trying to prep. Start with a cup and see how far this gets you. The mixing is possible without an immersion blender but it will take some coercion as the tannic acid tends to form sticky clumps that adhere to the sides of your container as well as whatever tool you’re mixing with. Blend or mix until all the tannic acid is evenly incorporated into the milk. If clumps remain, they tend to form streaks/dark marks on the fabric.
• Wet out, then wring your fabric until no more water comes out. The addition of moisture to your fabric helps the milk/tannin mixture evenly coat the fibers. If the fabric is too wet, you’ll water down your tannin mixture and apply too thin a coat of the mix onto the fabric, but if it is bone dry, you’ll tend to have a hard time getting the mix to apply evenly and you’ll end up with dark patches of excess tannin on the fabric.
• Immerse your fabric in the milk tannin mix in the stock pot and fully hydrate. Swish briefly allowing the milk to penetrate the fibers. Wring excess milk/tannin back into the bowl where it can continue to be used until exhausted.
• Dry fabric without rinsing. You can place the fabric into a tumble dryer for even, consistent results, but you can also simply lay your fabric out on the ground and let it dry horizontally which will allow for an even coating. If you choose to dry your fabric on a clothesline, rotate it a couple times during the drying process which will allow the coating to dry evenly. If you just hang it in a single position, the milk/tannin tends to pool on the bottom and evaporate from the high points of the fabric, leaving streaks.
• Fabric prepared in this manner and properly dried can be stored indefinitely for future use.
• Mix your liquid ferrous acetate with 1% by weight guar gum (I like mine a little runny, so 0.8g is a good starting point to add to the the recipe below) using the immersion blender. It is challenging to properly incorporate the guar into the mix without a blender, but a whisk could do the trick in a pinch.
Ferrous acetate can be formed by soaking iron filings/scraps in vinegar for a fortnight (fun for a future post, or if anyone has a link to a good recipe, let me know and I'll post it) OR by this recipe:
Distilled white vinegar (or really any vinegar with 5% acetic acid content) : 100g
Ferrous Sulfate Heptahydrate : 5.0g
Sodium Carbonate (Soda Ash) : 2.5g
Combine all ingredients in an overly-large container as this mix creates quite a froth from all the excess carbon dioxide that is released by the reaction.
This mix may be scaled proportionally. If you want more, just multiply.
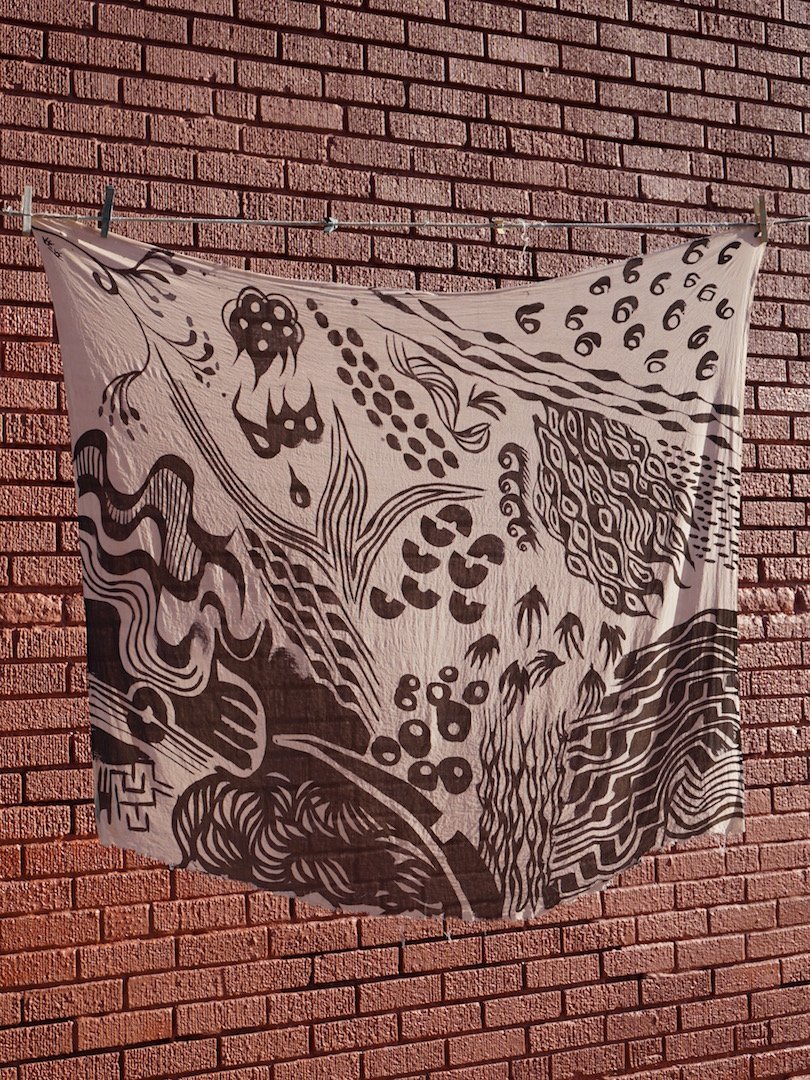
• The fabric can now be spread onto a table or work surface. I stretch and pin my fabric while printing or drawing on it which keeps the fabric from dragging on the brush or bunching under the block.

• Apply the slightly thickened ferrous acetate to the fabric by whatever means you’d like. You’ll notice that though the print medium is transparent to opaque orange, when it is applied to the fabric, it combines with the tannins to create a deep gray. If your mark making tends to bleed out from where you’ve applied, try giving future fabrics another round of milk/tannin soaking after they are dry from the first round. The additional milk will help to keep your mark making in place. Alternatively, consier adding another 20% more guar (e.g. add 0.2g guar to a mix that had previously received 1.0g for a total of 1.2g) to thicken the mordant paste.

• Allow your graphic to dry on the fabric. All the way. Do not spread, smear, fold or bunch the fabric as it will transfer mordant to the unmarked areas on the background.

• Fill your top loading washing machine with warm water and add 1/4cup soda ash and dissolve it into the liquid. Dunk your piece in all at once and allow it to finish the wash cycle. If you don’t have a top loading machine, use your sink, a deep stainless steel pot or a bathtub and a heaping teaspoon of soda ash per gallon of water. Gently immerse your fabric and work it around in the liquid, ideally for AT LEAST 5 minutes or so. You’ll see that the water/soda ash will become a dirty gray/brown/orange color. This is quite dilute and will not dye your fabric. This process fixes the ferrous mordant into place.
If you happen to have a river at your disposal, this is a wonderful time and place to use it! In lieu of all this soda ash soaking, you can rinse your piece in flowing water until no more of the mordant rinses off. Leave it overnight if you can!
• Once the ferrous acetate has been fixed onto the fabric, you may notice that your graphic has turned more orange or faded. You can re-darken this piece with the addition of a little more tannic acid. Again, I typically use the washing machine. I’ll dissolve a teaspoon of tannic acid into hot water, then transfer the solution into a washing machine full of hot water. Sink your fabric and allow the cycle to complete (agitation followed by rinse). Again this can be completed by hand in a sink or bucket if that's all you've got at your disposal. The longer the item soaks in the tannin liquid, the darker it will become, up to a point. This is a matter of choice. Remove your piece when you're satisfied with the shade.
• Finally, I'll run the goods through another wash cycle in the machine, this time adding about 1/4 cup of vinegar (a dilute acid) to the bath. This serves to pH shift the tone toward a more even gray from the brown/beige look imparted by the alkaline soda ash.
• I'm now a fan of a post-dyeing fabric sizing in soy which improves the hand feel of the fabric and adds a layer of protection atop the dyes. You can find a wonderful recipe here.